My Sagrantino Cup 2020 flights

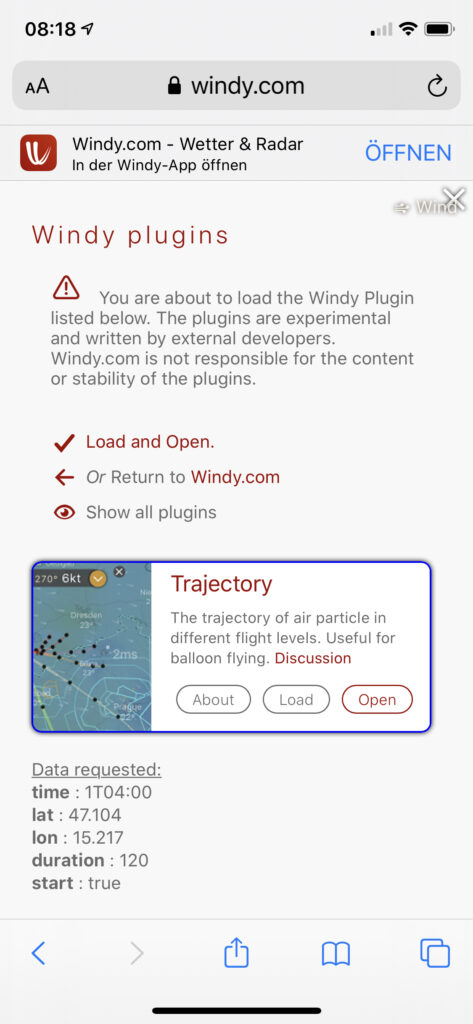
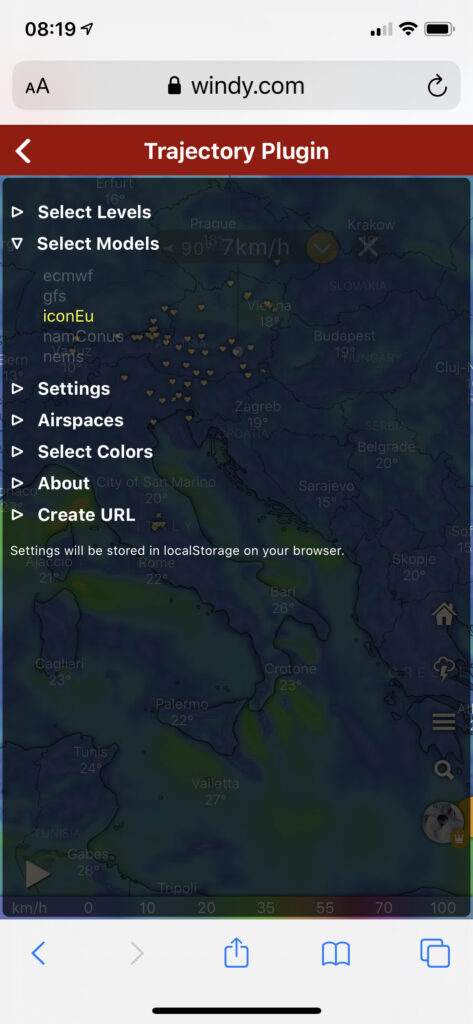
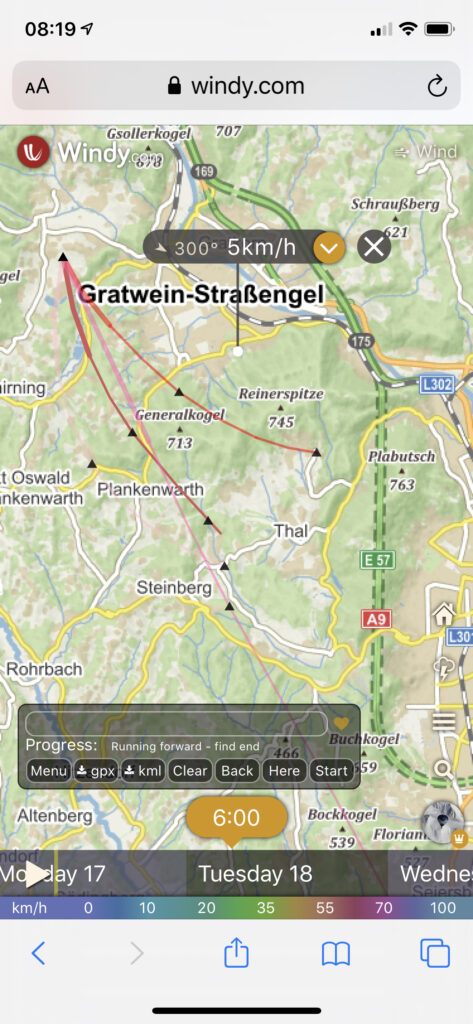
See here for the full-screen version.

How to do it

These are GPX files unloaded from my Garmin 695 and processed with gpsvisualizer.com. If you look closely at the end of say, the dark blue track, and click at one of the bullets along the track, you will find this:

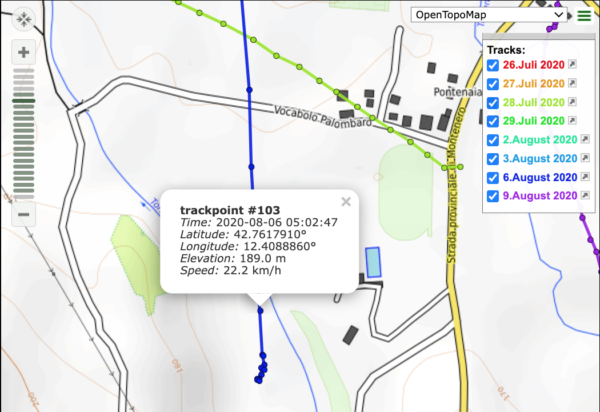
This popup shows a speed value (22km/h just before a rather rough landing). Gpsvisualizer needs this speed value to be in the GPX file before uploading – however, Garmin GPX files do not contain this value. Let’s look at a fragment of a GPX file as unloaded from the Garmin 695:

      <trkpt lat="42.761791000" lon="12.408886000">
        <ele>189.036</ele>
        <time>2020-08-06T05:02:47Z</time>
      </trkpt>

No speed value there – just latitude, longitude, time, elevation. However, one can add speed values to a GPX file with the venerable gpsbabel utility like so (I’m using a shell command here, but you should be able to find a GUI version of gpsbabel for your platform):

 $ gpsbabel -t -i gpx -f input.gpx -x track,speed -o gpx,gpxver=1.0 -F output.gpx

After this step, looking at ‘output.gpx’ we find the speed value (6m/s or 22km/h) was added by looking at time and position of neighbouring points:

      <trkpt lat="42.761791000" lon="12.408886000">
        <ele>189.036</ele>
        <time>2020-08-06T05:02:47Z</time>
        <speed>6.152827</speed>
      </trkpt>

And if you get a track from Ultramagic Flightpack..

you are in for a surprise: great application, and the most brain-dead suboptimal track export format in the industry: a KML file which does NOT have a machine readable starting time, nor do the waypoints have timestamps. There is NO way to automatically convert this track to a GPX file with timestamps – you need an editor and look at the file contents to retrieve the starting time and waypoint interval. Let’s look at this beauty:

<?xml version="1.0" encoding="UTF-8"?><kml xmlns="http://www.opengis.net/kml/2.2">
<Document>
<name>track 15_08_2019 06_33_21.kml</name>
<description>Track created by Ultramagic FlightPack - Starting at time 15_08_2019 06_33_21 - Sampling period is 3 seconds - Flight duration is 1 h 8 min</description>
<Style id="path0Style"><LineStyle><color>7f00ffff</color><width>20</width></LineStyle></Style>
<Placemark><name>track 15_08_2019 06_33_21.kml</name>
<styleUrl>#path0Style</styleUrl>
<LineString><altitudeMode>absolute</altitudeMode><coordinates>
15.632430883139,48.4467375744585,314.975244567425 
15.632430883139,48.4467375744585,314.918412871592 

So the fact that this track starts at Aug 15, 2019 05:33:21 and each point is sampled 3 seconds apart is hidden in a comment – meaning all KML-processing programs will ignore it.

Again, gpsbabel helps into making this mess usable again – it can add ‘fake timestamps’ as starting time and equally spaced for each waypoint – so after getting the clue from above we can do this:

$ gpsbabel -i kml -f 'track_15_08_2019 06_33_21.kml' -x track,faketime=f20190815063321+3 -o gpx -F output.gpx
$ gpsbabel -i gpx -f output.gpx  -x track,speed -o gpx,gpxver=1.0 -F final.gpx

Gpsbabel needs two steps to fix this up. Thereafter, final.gpx looks usable:

      <trkpt lat="48.450746052" lon="15.634726184">
        <ele>517.158</ele>
        <time>2019-08-15T06:42:51Z</time>
        <speed>2.132435</speed>
      </trkpt>

I’ve reported this to Ultramagic last August, asking them to fix it. I got an unpleasant reply. Other than that, Flightpack is still producing nonsense. Thanks, guys!

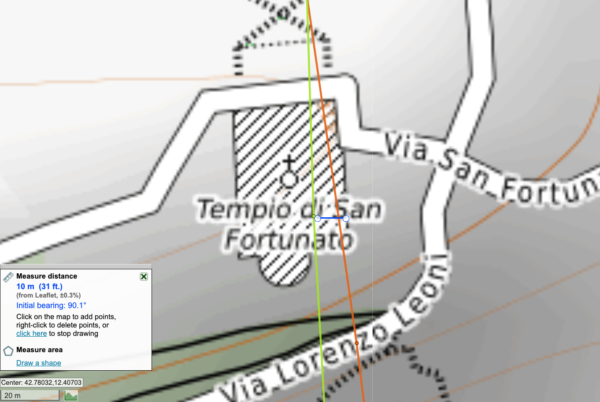
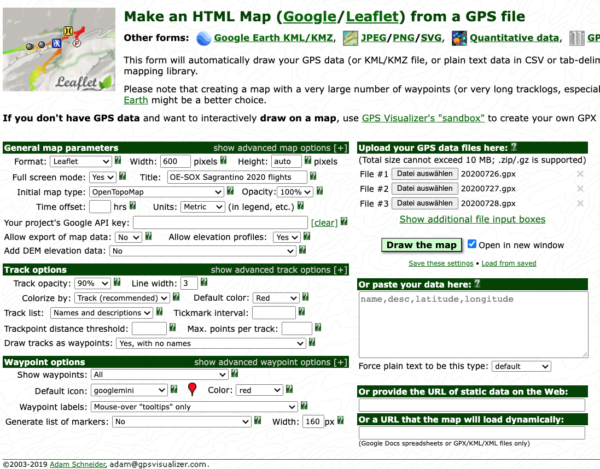
Next step: visit gpsvisualizer and add all processed GPX files in the list of uploads. Also, set the parameters according to this image:

Click on ‘Draw the map’, and download the resulting HTML file. That is what you are seeing above.

Experimental: running traj on an iphone

Big Fat Warning: do not proceed if you are not familiar with HTML and Javascript. This is not for the faint of heart and ‘end users’. It is work-in-progress by Chris to work around the iphone issue documented here (section ‘Does it work on my laptop/pad/mobile?’, note on iphone).

With that said, there is a way to run traj on an iphone, but it is a bit involved. First, it needs a bit of HTML containing Javascript on your server – find that HTML file here.

Next, you need to construct the link such that it uses that HTML file as a trampoline, here is an example:

https://blog.mah.priv.at/mah/windyredirect.html?traj?time=1T04:00&lat=47.104&lon=15.217&duration=120&start=true

Here is an example page containing this link. If you click this link on an iphone, the following sequence will get you to run traj:


(on all other platforms except iphone, clicking the link above will take you straight to windy running in a browser tab!)

Next, long-press the link displayed there, this will what will show up:

Press the ‘open in new tab’ option from the lower menu:

Now click the ‘Open’ button, and you are almost there..:

Wait a bit until traj has done it’s thing, and there you are:

VoilĂ ! traj on an iphone!

This is just a proof-of-concept that it’s possible and maybe some kind soul with an advanced degree in web hackery can pick up from here.

Todi Precision Approaches

As every year at the Sagrantino Cup in Umbria, Italy, hot air balloon pilots attempt to fly over the town of Todi – situated on a hill and inhabited since Etruscan times. The most prominent feature is the church tower – the Campanile of San Fortunato . And of course, pilots vye to fly right over this tower. This year was no exception – I collected tracks from other pilots and here are the tracks (full screen version):

Matthias and myself came as close as a few meters:

David kindly sent me some pictures from this flight:

Here’s a video from my balloon OE-SOX passing over the campanile:

Constructing Windy traj links for sharing

This is a more detailed followup to my previous post on Sharing & Bookmarking Windy trajectories which should be read first. Since I initially wrote this, Chris has added a ‘Create URL’ section to the traj menu which makes link building much easier – see the ‘Using the Create URL feature’ section. I’ll leave the ‘URL and parameters’ section as reference.

Usage scenarios

Here I describe how to construct windy traj links in detail, and use them in the two predominant scenarios as I see them in the ballooning context:

  1. A pilot bookmarking her favourite location(s) for checking if today/tomorrow etc is flyable and where the trip goes
  2. A meteo briefing at a ballooning event such that everybody receives exactly the same information.

Private bookmarks/links

For 1) I assume the user already has used windy traj before and hence set preferences (levels, models, duration etc) as she sees fit. Those preferences are already stored in a cookie in the browser – next time you’d use traj, those preferences come up again as set previously. Also, that would likely be bookmarks for everyday use, so relative time links as described here would be date-independent and hence could be pasted into a web page.

In that case, all we need to specify is lat, lon, relative time and optionally autostart. Here’s an example minimal time-relative link which relies on cookie settings for levels, models, duration etc – this would yield trajectories for tomorrow 04:00UTC whenever called – go ahead, copy this, paste it into a new browser tab’s address field and see for yourself:

https://www.windy.com/plugins/windy-plugin-traj?time=1T04:00&lat=48.439&lon=15.674&start=true

Briefing reference links

For 2) , it’s more relevant that everybody receives the same information – so absolute time, pre-set models and levels are more used. In that case, I’d use a link which exactly lays out all relevant options:

https://www.windy.com/plugins/windy-plugin-traj?time=2020-08-16T04:00&lat=48.439&lon=15.674&models=iconEu&levels=surface,100m,975h,950h,925h,900h,850h,800h&duration=120&ascent=0&descent=0&sample=5&sampleAscDes=1&start=true

This would create trajectories for August 8, 2020, 04:00 UTC only, using the iconEU model, and the levels listed above. Also, duration and sampling intervals are set explicitly. Clicking this link would yield the exact same screen result for each user regardless of the users’ own preferences set before.

Using the Create URL feature

There’s a new section in the expanded menu on the left side – it makes the export of a custom URL like outlined above really easy. Instead of manually creating a URL as shown in the reference section below, you use the traj settings options per se: set location by moving the location marker, set time by setting the time selector, choose models/levels/duration as you would previously.

Then, go to the ‘Create URL’ section and set those portions which you want exported, including setting absolute or relative time.

Hover over the URL box just below the ‘Create URL’ header, right-click, copy link address, and your custom URL is copied to the clipboard ready to be pasted into HTML, opened or added to a bookmark!

Here’s a step-by-step example how to create a bookmark for tomorrow morning’s trajectories:

Update: Try the ‘Copy URL’ button – in the video I had used right-click/copy link address because at the time the ‘Copy URL’ button did not work properly. It does now.

Eating our own dogfood – the links in this page have been updated using the method outlined in the video.

Does it work on my laptop/pad/mobile?

laptop or PC:

  • Apple macOS: Safari, Chrome, Brave, Firefox – no issues
  • Windows 10: Chrome, Edge, Brave, Firefox – no issues
  • Linux laptop: untested, but likely OK with Chrome or Firefox

Pads:

  • iPad (as of iOS 13.6.1): no issues with Chrome, Safari
  • Google Nexus 10 (Android 5.1.1): works fine with Chrome

Mobile phone:

  • Samsung Galaxy S10 (Android): works fine with Chrome
  • iPhone X (iOS 13.6.1): broken – currently does NOT work with any browser

So the iPhone currently is the only platform where traj linking does not work. It’s being looked into – what happens is: if you click a link the Windy app opens instead of a browser tab, and the app is not capable of running plugins.

Reference: URL and parameters

The URL begins like so:

https://www.windy.com/plugins/windy-plugin-traj?

and is followed by the parameters, which are key/value pairs of the style ‘key=value’ or ‘key=value,value,value…’ in case of lists of values. Key-value pairs need to be separated by an & (ampersand) character.

For reference, here are all the URL parameters supported by the windy traj plugin:

KeyMeaningvaluesexample
latlatitude, decimal degrees-90..90lat=48.439
lonlongitude, decimal degrees-180..180lon=15.674
timeYYYY-MM-DDTHH:MM
(absolute date) or
DTHH:MM
(relative date/time)
a valid date into the future, or number of days into the future, followed by a full hour (UTC)time=2020-08-16T16:00

time=1T04:00
modelsforecast modelsgfs (global)
ecmwf (global)
iconEu (Europe)
nems (global)
namConus (Lower48)
namAlaska (Alaska)
namHawaii (Hawaii)
models=iconEU,ecmwf
levelsvalid for gfs:surface, 100m, 975h, 950h, 925h, 900h, 850h, 800h, 700h, 600h, 500h, 400h, 300h, 250h, 200h, 150hlevels=surface,975h
levelsvalid for ecmwf:surface, 100m, 950h, 925h, 900h, 850h, 800h, 700h, 600h, 500h, 400h, 300h, 250h, 200h, 150hlevels=surface,950h
levelsvalid for nemssurface, 975h, 950h, 925h, 900h, 850hlevels=surface,975h
levelsvalid for namConus:surface, 975h, 950h, 925h, 900h, 850h, 800h, 700h, 600h, 500h, 400h, 300h, 250h, 200h, 150hlevels=surface,975h
levelsvalid for namAlaska:surface, 975h, 950h, 925h, 900h, 850h, 800h, 700h, 600h, 500h, 400h, 300h, 250h, 200h, 150hlevels=surface,975h
levelsvalid for namHawaii:surface, 975h, 950h, 925h, 900h, 850h, 800h, 700h, 600h, 500h, 400h, 300h, 250h, 200h, 150hlevels=surface,975h
durationforecast time in minutes60..1440
(1 hour .. 10 days)
duration=120
ascentascent rate
(m/s)
0..6
set to 0 to disable ascent simulation
ascent=2
descentdescent rate
(m/s)
0..6
set to 0 to disable descent simulation
descent=3
samplesampling interval in minutes5..180 minutessample=5
sampleAscDessampling interval in minutes during ascent and descent0.5..15 minutessampleAscDesc=1
startstarts immediate calculation of trajectoriestrue
if not present, need to click ‘Start’ button
start=true
List of supported traj URL parameters

Sharing & Bookmarking Windy trajectories

Chris (of windy traj plugin fame) could not join my team for the Sagrantino Cup balloon event due to the pandemic. But he used the time to improve traj – and it has improved a lot!

Speedup

Previously, generating trajectories for many altitudes and several models could take quite a while – since every calculated point would need an interaction with the windy server backend. Chris changed this so the relevant data tiles are downloaded once into the browser and all path calculation happens locally in the browser. Now it’s as fast as Meteoblue!

Sharing trajectories

“Look, tomorrow looks flyable!” – a common message, and then.. attach what? a screenshot? a GPX or KML track? What I did so far is: download the trajectories as GPX tracks, then massage them with gpsvisualizer.com, download the resulting HTML file, upload that file to my server, and share a link to that file – for example, like so. That’s quite tedious, and precludes the recipient from running traj with the original parameters but later (for updated forecast values) or different parameters/models.

Chris has now added this capability and it has turned out super useful. Before trying yourself, read the restrictions:

  • this only works with a real browser – to make it work on a mobile or pad, you need to copy the link, and paste it into a browser
  • once you open the link, you’ll see a popup – acknowledge it by clicking ‘Open’:

With that said: give it a try here. This is what’s going to happen:

Running a windy trajectory from a link

So what has happened here?

  • You saw the popup pane on the left side, and me clicking ‘Open’ to proceed.
  • The traj plugin came up, with parameters pre-set, like location, models, altitude, duration and so forth. And starting time – more on that later.
  • The trajectory computation automatically started and the window centered and zoomed such that all tracks are visible – all I had to is pan out a bit so the detailed map is hidden. Done!

Let’s dissect the link above and look under the hood:

https://www.windy.com/plugins/windy-plugin-traj?time=1T04:00&lat=48.439&lon=15.674&models=iconEu&levels=surface,100m,975h,950h,925h,900h,850h,800h&duration=120&ascent=0&descent=0&sample=5&sampleAscDes=1&start=true?5,m:eXFagAz

The first part of the link (https://www.windy.com/plugins/windy-plugin-traj) up to the first question mark calls the windy website and tells it to open the traj plugin. That part causes the popup you saw in the image and video above.

The rest of the URL consist of normal parameters of the style key=value and separated by ‘&‘. Most of them will be self-explanatory – like lat, lon, models, levels, duration and so forth – the start=true parameter causes immediate calculation of the tracks as soon as the plugin is loaded. It’s equivalent to clicking the ‘Start’ button in the small traj menu box.

The time parameter is always interpreted as UTC (Zulu time) and can be one of two flavors:

  • an absolute date and time like time=2020-08-13T04:00– August 13, 2020, 04:00 UTC
  • a relative date and time like time=1T04:00 meaning tomorrow 04:00 UTC (for today use ‘0T<time>’, for day after tomorrow use ‘2T<time> etc)

I’ll write up a detailed parameter description eventually but I’ll let things settle down a but first – all this is rather fresh code. Note that the parameters from the URL are shown in the initial popup.

Why use relative time?

Well, the nice part of a relative-time URL is: it never changes – tomorrow always means ‘tomorrow’, but 2020-08-14T04:00 means ‘tomorrow’ only today as I am writing this. So you can paste a link for ‘tomorrow morning trajectories’ or ‘tomorrow trajectories’ in a website. And: you can bookmark them and name them.

So next time you want to know if tomorrow is flyable: click on the ‘tomorrow morning’ bookmark which has all your favourite settings, and you’re done!

And since this weekend a balloon event is coming up: here’s an example for time-relative links for Gneixendorf, Austria.