Meteologix has an interesting way to show how finely weather models resolve topography – you can choose a model and a map section, and see how many „model data points” cover that region – click on the navigation arrows below the image to page through different models:
GFS global
Image 1 of 5
The differences become more apparent by zooming in on a smaller region – here Tyrol and Styria:
GFS global
Image 1 of 5
GFS global
Image 1 of 5
So GFS for instance does not even „see” major alpine valleys due to its large forecast point spacing – for that one needs a higher resolution model.
Good reminder to take forecasts with a grain of salt!
Big Fat Warning: do not proceed if you are not familiar with HTML and Javascript. This is not for the faint of heart and ‘end users’. It is work-in-progress by Chris to work around the iphone issue documented here (section ‘Does it work on my laptop/pad/mobile?’, note on iphone).
With that said, there is a way to run traj on an iphone, but it is a bit involved. First, it needs a bit of HTML containing Javascript on your server – find that HTML file here.
Next, you need to construct the link such that it uses that HTML file as a trampoline, here is an example:
This is a more detailed followup to my previous post on Sharing & Bookmarking Windy trajectories which should be read first. Since I initially wrote this, Chris has added a ‘Create URL’ section to the traj menu which makes link building much easier – see the ‘Using the Create URL feature’ section. I’ll leave the ‘URL and parameters’ section as reference.
Usage scenarios
Here I describe how to construct windy traj links in detail, and use them in the two predominant scenarios as I see them in the ballooning context:
A pilot bookmarking her favourite location(s) for checking if today/tomorrow etc is flyable and where the trip goes
A meteo briefing at a ballooning event such that everybody receives exactly the same information.
Private bookmarks/links
For 1) I assume the user already has used windy traj before and hence set preferences (levels, models, duration etc) as she sees fit. Those preferences are already stored in a cookie in the browser – next time you’d use traj, those preferences come up again as set previously. Also, that would likely be bookmarks for everyday use, so relative time links as described here would be date-independent and hence could be pasted into a web page.
In that case, all we need to specify is lat, lon, relative time and optionally autostart. Here’s an example minimal time-relative link which relies on cookie settings for levels, models, duration etc – this would yield trajectories for tomorrow 04:00UTC whenever called – go ahead, copy this, paste it into a new browser tab’s address field and see for yourself:
For 2) , it’s more relevant that everybody receives the same information – so absolute time, pre-set models and levels are more used. In that case, I’d use a link which exactly lays out all relevant options:
This would create trajectories for August 8, 2020, 04:00 UTC only, using the iconEU model, and the levels listed above. Also, duration and sampling intervals are set explicitly. Clicking this link would yield the exact same screen result for each user regardless of the users’ own preferences set before.
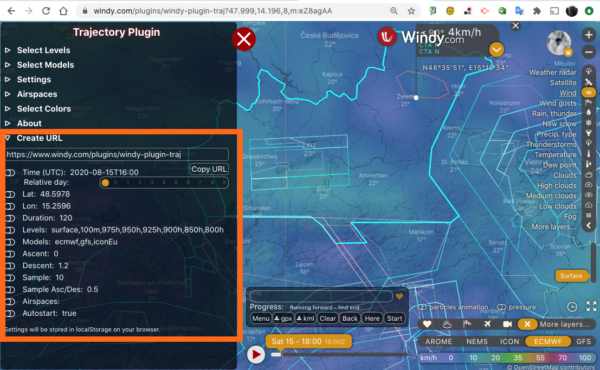
Using the Create URL feature
There’s a new section in the expanded menu on the left side – it makes the export of a custom URL like outlined above really easy. Instead of manually creating a URL as shown in the reference section below, you use the traj settings options per se: set location by moving the location marker, set time by setting the time selector, choose models/levels/duration as you would previously.
Then, go to the ‘Create URL’ section and set those portions which you want exported, including setting absolute or relative time.
Hover over the URL box just below the ‘Create URL’ header, right-click, copy link address, and your custom URL is copied to the clipboard ready to be pasted into HTML, opened or added to a bookmark!
Here’s a step-by-step example how to create a bookmark for tomorrow morning’s trajectories:
Update: Try the ‘Copy URL’ button – in the video I had used right-click/copy link address because at the time the ‘Copy URL’ button did not work properly. It does now.
Eating our own dogfood – the links in this page have been updated using the method outlined in the video.
Does it work on my laptop/pad/mobile?
laptop or PC:
Apple macOS: Safari, Chrome, Brave, Firefox – no issues
Windows 10: Chrome, Edge, Brave, Firefox – no issues
Linux laptop: untested, but likely OK with Chrome or Firefox
Pads:
iPad (as of iOS 13.6.1): no issues with Chrome, Safari
Google Nexus 10 (Android 5.1.1): works fine with Chrome
Mobile phone:
Samsung Galaxy S10 (Android): works fine with Chrome
iPhone X (iOS 13.6.1): broken – currently does NOT work with any browser
So the iPhone currently is the only platform where traj linking does not work. It’s being looked into – what happens is: if you click a link the Windy app opens instead of a browser tab, and the app is not capable of running plugins.
Reference: URL and parameters
The URL begins like so:
https://www.windy.com/plugins/windy-plugin-traj?
and is followed by the parameters, which are key/value pairs of the style ‘key=value’ or ‘key=value,value,value…’ in case of lists of values. Key-value pairs need to be separated by an & (ampersand) character.
For reference, here are all the URL parameters supported by the windy traj plugin:
Chris (of windy traj plugin fame) could not join my team for the Sagrantino Cup balloon event due to the pandemic. But he used the time to improve traj – and it has improved a lot!
Speedup
Previously, generating trajectories for many altitudes and several models could take quite a while – since every calculated point would need an interaction with the windy server backend. Chris changed this so the relevant data tiles are downloaded once into the browser and all path calculation happens locally in the browser. Now it’s as fast as Meteoblue!
Sharing trajectories
“Look, tomorrow looks flyable!” – a common message, and then.. attach what? a screenshot? a GPX or KML track? What I did so far is: download the trajectories as GPX tracks, then massage them with gpsvisualizer.com, download the resulting HTML file, upload that file to my server, and share a link to that file – for example, like so. That’s quite tedious, and precludes the recipient from running traj with the original parameters but later (for updated forecast values) or different parameters/models.
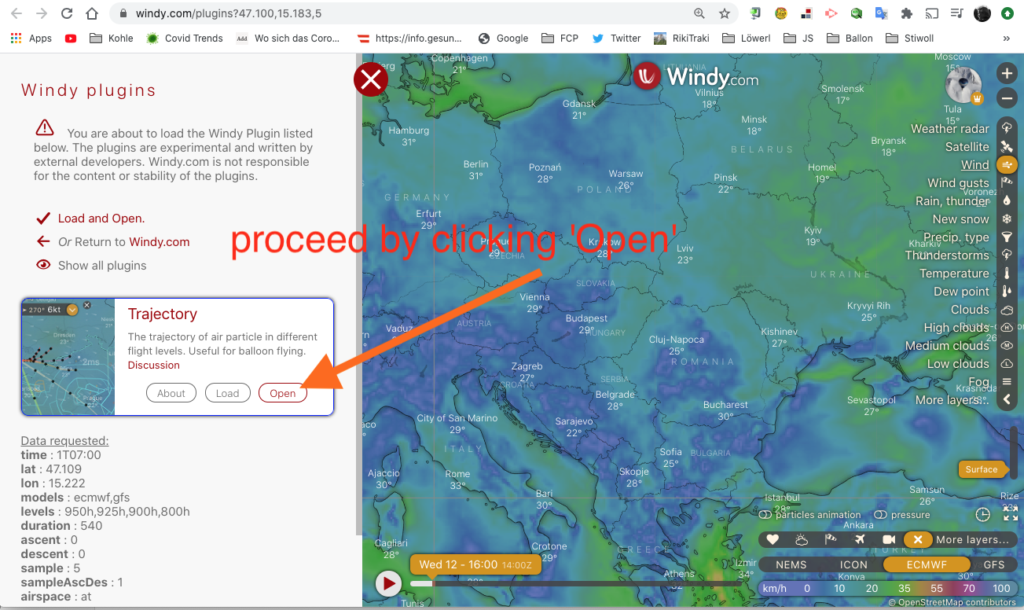
Chris has now added this capability and it has turned out super useful. Before trying yourself, read the restrictions:
this only works with a real browser – to make it work on a mobile or pad, you need to copy the link, and paste it into a browser
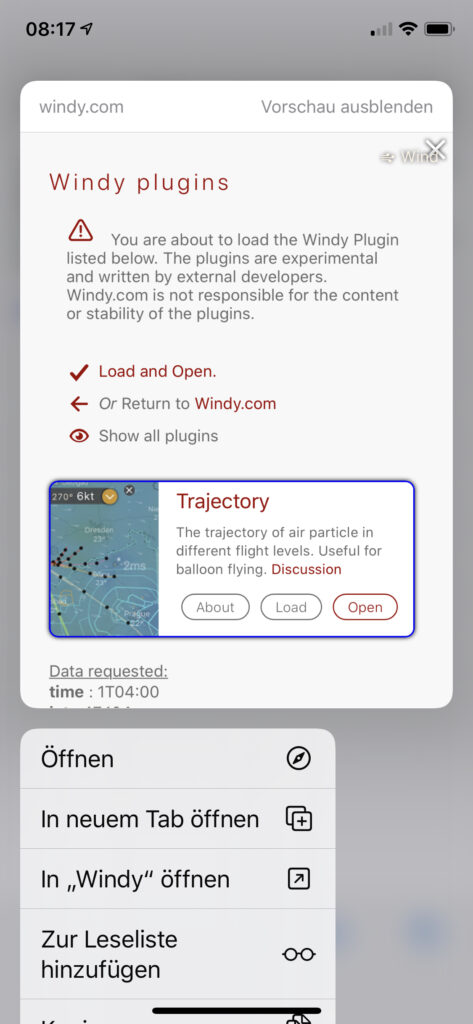
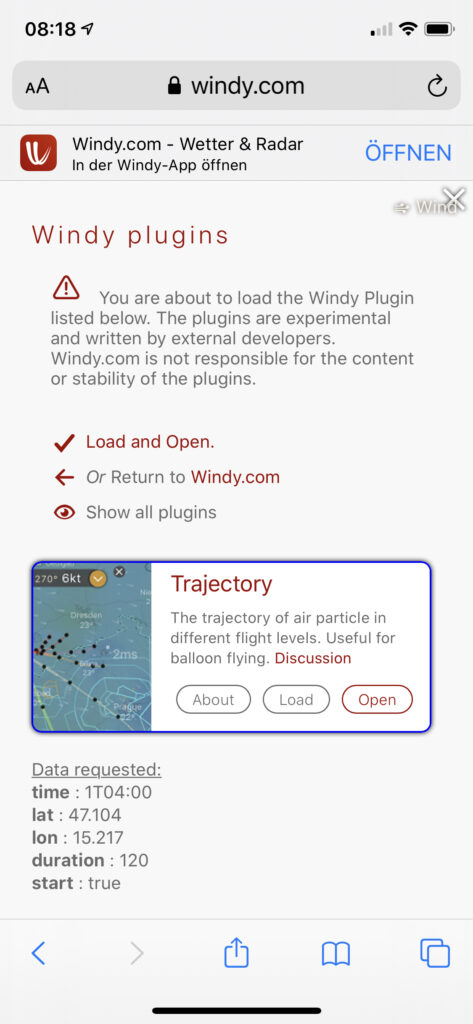
once you open the link, you’ll see a popup – acknowledge it by clicking ‘Open’:
You saw the popup pane on the left side, and me clicking ‘Open’ to proceed.
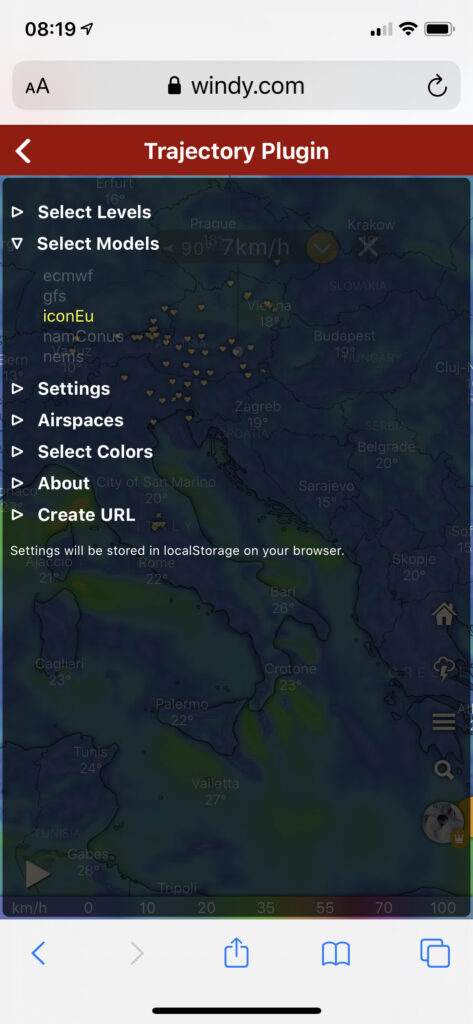
The traj plugin came up, with parameters pre-set, like location, models, altitude, duration and so forth. And starting time – more on that later.
The trajectory computation automatically started and the window centered and zoomed such that all tracks are visible – all I had to is pan out a bit so the detailed map is hidden. Done!
Let’s dissect the link above and look under the hood:
The first part of the link (https://www.windy.com/plugins/windy-plugin-traj) up to the first question mark calls the windy website and tells it to open the traj plugin. That part causes the popup you saw in the image and video above.
The rest of the URL consist of normal parameters of the style key=value and separated by ‘&‘. Most of them will be self-explanatory – like lat, lon, models, levels, duration and so forth – the start=true parameter causes immediate calculation of the tracks as soon as the plugin is loaded. It’s equivalent to clicking the ‘Start’ button in the small traj menu box.
The time parameter is always interpreted as UTC (Zulu time) and can be one of two flavors:
an absolute date and time like time=2020-08-13T04:00– August 13, 2020, 04:00 UTC
a relative date and time like time=1T04:00 meaning tomorrow 04:00 UTC (for today use ‘0T<time>’, for day after tomorrow use ‘2T<time> etc)
I’ll write up a detailed parameter description eventually but I’ll let things settle down a but first – all this is rather fresh code. Note that the parameters from the URL are shown in the initial popup.
Why use relative time?
Well, the nice part of a relative-time URL is: it never changes – tomorrow always means ‘tomorrow’, but 2020-08-14T04:00 means ‘tomorrow’ only today as I am writing this. So you can paste a link for ‘tomorrow morning trajectories’ or ‘tomorrow trajectories’ in a website. And: you can bookmark them and name them.
So next time you want to know if tomorrow is flyable: click on the ‘tomorrow morning’ bookmark which has all your favourite settings, and you’re done!
Today several balloonists “went across” – for a long distance flight over the Alps.
Here is one track flown compared to the forecast I did with windy traj with the ECMWF and iconEU models. Note that takeoff was at 0600Z but the forecast was for 0700Z. Most of the flight was around 2800m altitude, so the 3000m/700hPa tracks are the closest match (you can disable the irrelevant altitudes by clicking them away in the top right box).
The track is mostly right between the ECMWF and iconEU forecasts. Also, note the accuracy of speed forecasted – click on some track points and the rings of the forecasts to see the values (click here for full-screen display):
It covers the basics – organizing your layers and preferences, plugin use, and using geopotential height forecasts for early spotting of long-distance flight opportunities.
Drop me a line if you find errors, or have suggestions for improvement.
selecting between accuracy and speed: using the ‘Layer Interpolation’ switch
Let’s go through these in turn:
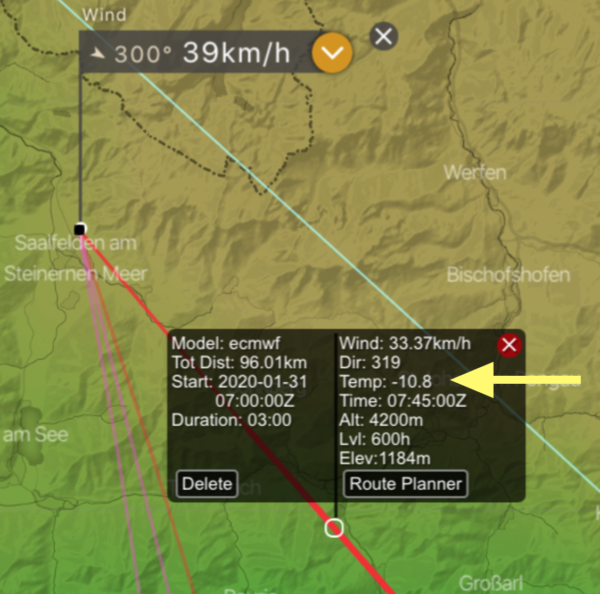
Temperature along a path
Once you have created a path, click on a point along the track. The popup shows the forecasted temperature at this location – useful for the loading calculation, and planning proper clothing:
the outside air temperature displayed along the path
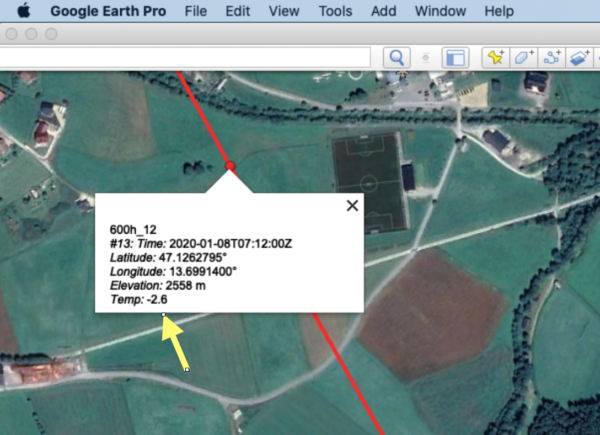
Tracks downloaded as KML or GPX files will carry along temperature values except for ECMWF-generated tracks. You can see the temperature forecasts in windy, but due to licensing constraints the values are not exported for ECMWF.
Not every program which reads GPX files actually can display these values. Barring a better alternative, exporting in KML and reading in Google Earth will display temperature values:
Google Earth will show temperature values when importing a windy-traj generated KML file
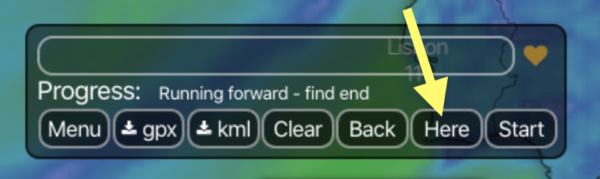
Here: warp me to where I am!
On a recent balloon ride we had to decide wether to rise, descend, or stay level to reach a certain target. Since we had mobile Internet coverage, we used windy to re-generate trajectories for different altitude choices.
As always, you need a starting location. So that’s what the ‘Here’ button does: It will retrieve your current location, set the location picker, and – if an altitude value is available – set the next matching altitude.
I got a field report today from a gas balloon ride that this feature works exactly as advertised.
Model-specific markers
Generating tracks for several models and altitudes easily makes for a cluttered screen. So far, all tracks were marked with black circles in (by default hourly) intervals. All trajectories of a given model now have distinguishable black marker icons:
ECMWF – circle
GFS – rectangle
iconEU – triangle, upward pointing
nems, namConus – triangle, downward pointing
Selectively displaying altitudes and forecasts
Selecting several models and altitudes easily makes for a confusing screen. Chris added the capability to selectively turn on/off tracks by model and altitude. To do so, the menu needs to remain open – then, clicking models and altitudes will (de) select the display of the corresponding forecast track (click here for a full-screen version):
Addional forecast models: NEMS and namConus
This version adds two models:
namConus (North American Continental US), 5km grid, by NOAA, some 3 days lookahead)
NEMS by meteoblue.com, 4-12km grid, based on NOAA model with meteoblue extensions added, claims to be strong in Alpine areas, 2 days lookahead, ground up to 1500m (850hPa)
namConus seems generally useful for ballooning purposes and adds a third model for the North American continent in addition to ECWMF and GFS.
NEMS, however, looks rather restricted for aviation purposes as currently available in windy.com – lookahead two days only, and covering altitudes only up to 1500m, which makes it useless except for rather mundane flights. As it stands, this is not a replacement for the meteoblue trajectory function, which covers higher altitudes as well as six days lookahead – for a fee.
Note that NEMS trajectories currently only work with the ‘Layer Interpolation’ option selected – see next section.
Selecting between accuracy and speed
This version adds a switch in the menu: ‘Read data with:’ being ‘Data Loader’ or ‘Layer Interpolation’, with ‘Data Loader’ being the default.
If exploring NEMS trajectories, remember to select ‘Layer Interpolation’ or you will see a message ‘No model’ displayed. Also, remember – NEMS currently only works up to 1500m.
The way I understand this switch – it is a tradeoff between speed and accuracy. Layer interpolation works much quicker (almost an order of magnitude) but sometimes gives odd result.
My recommendation: if exploring many altitudes and models, it might make sense to select Layer interpolation initially, and to switch to Data Loader once you drill down to a smaller set of altitudes and models, yielding more accurate results.
Geekspeak: The Road Ahead (coders only)
Chris tried hard to accelerate trajectory computation, and the Data Loader/Layer Interpolation knob is a step in this direction. But at some point it might make sense to move work to the windy backend.
Right now all the work is done in the browser, but each data point needs a server interaction to retrieve a new value set – which slows things down considerably. That, however, is currently beyond the limitations of the windy plugin model, and would need a way to add user-contributed code to the windy server backend in a safe fashion. I understand things might be moving in this direction.
That said, let me stop the nit-picking: compared to the rest of the crowd, windy.com is a phenomenal step forward by making a weather application user-extensible and hence adapted to specific needs!
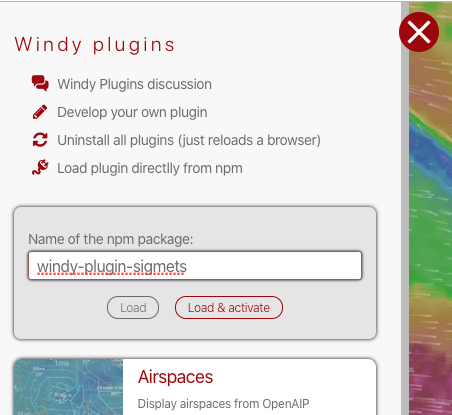
Update: the windy-plugin-sigmets function has been discontinued and the author has vanished the github repository mentioned below.
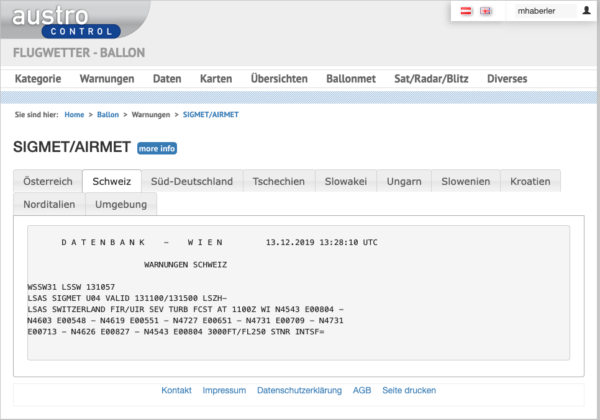
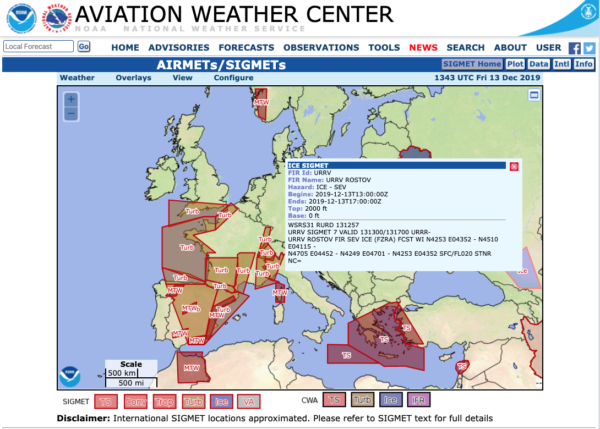
A SIGMET is a useful weather safety advisory. However, when those are buried in a bland website, few people have a look. Here’s an example as to how NOT present information, from our friendly Austrocontrol briefing website (login required):
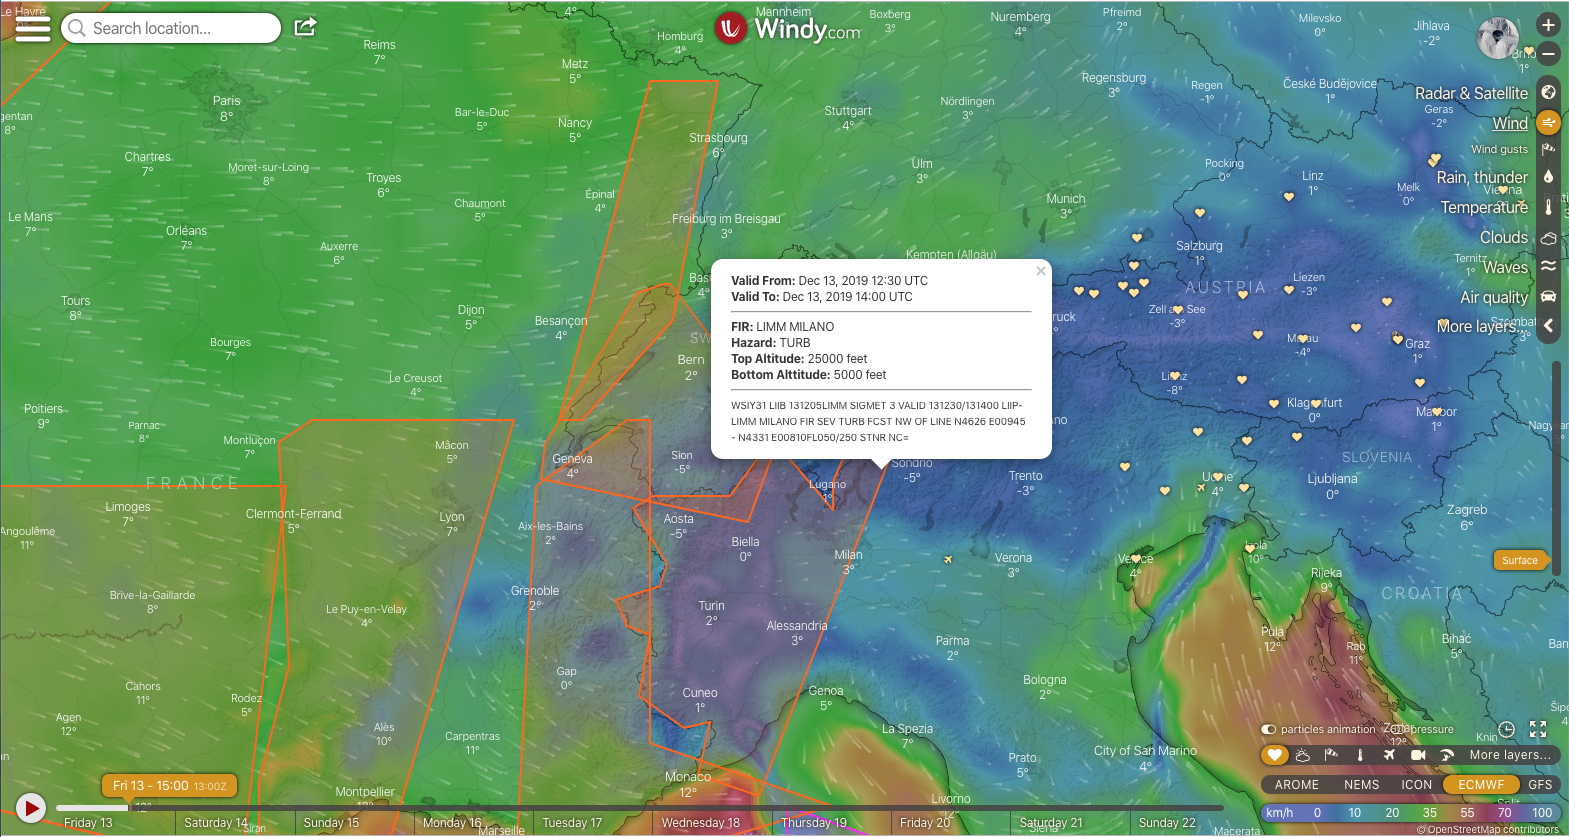
Can one do better? Yes they can – “they” being the prolific folks writing plugins for the superb Windy platform, this time windy-plugin-sigmets:
windy-plugin-sigmets in action
This is not yet in the list of official plugins, so to activate, one needs to click the ‘Hamburger menu’ (left top) -> ‘Install windy plugin’ -> ‘Load plugin directly from npm’ and enter ‘windy-plugin-sigmets’ like so:
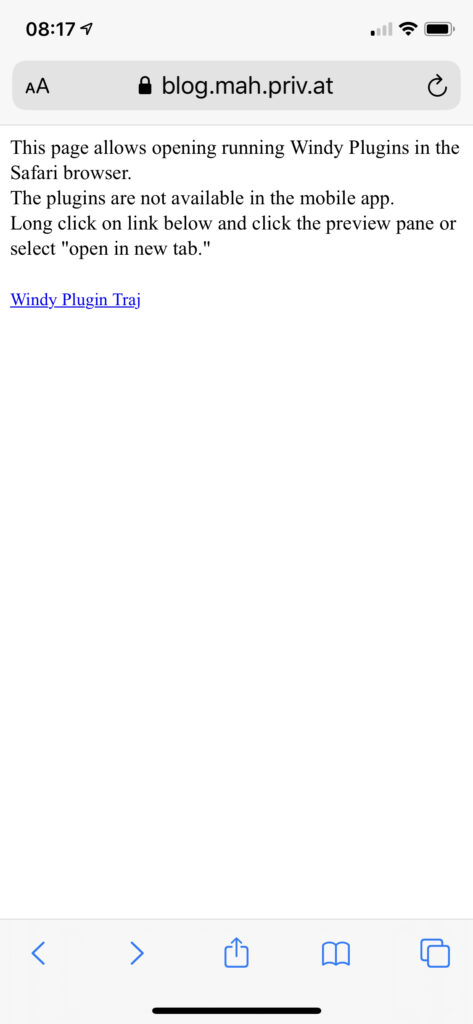
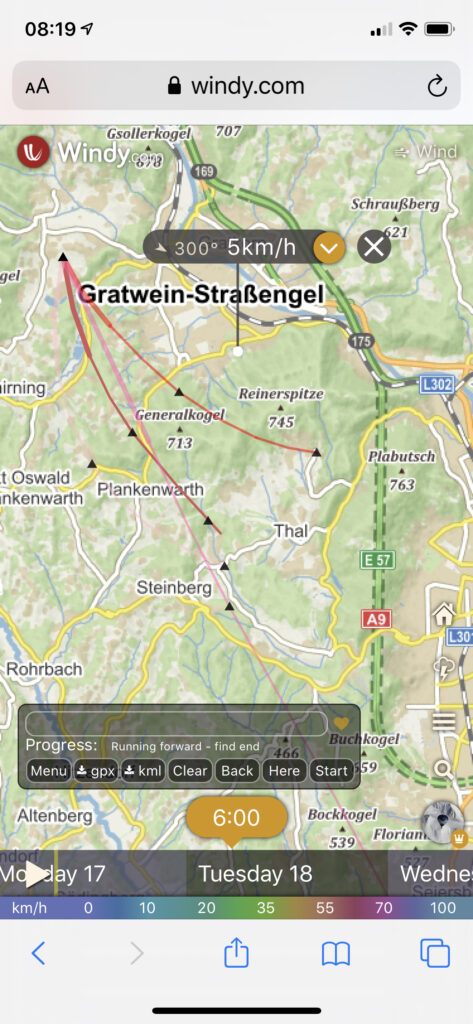
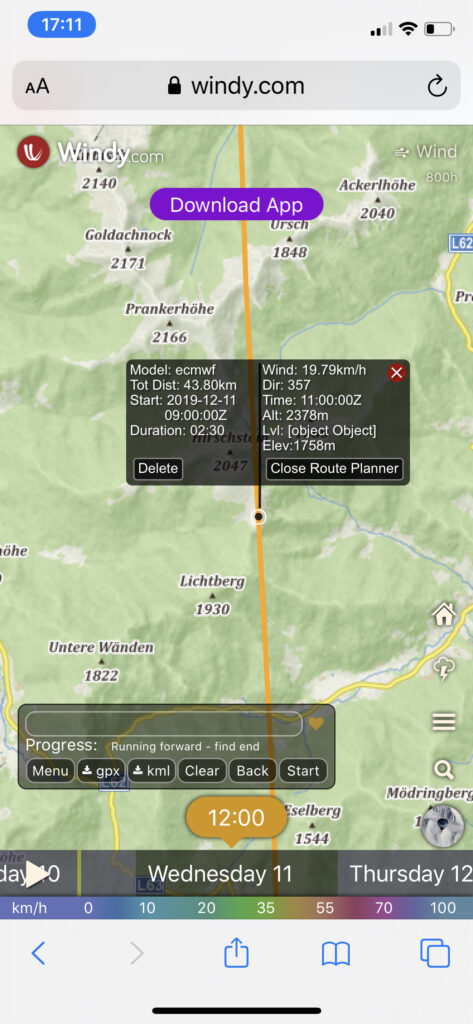
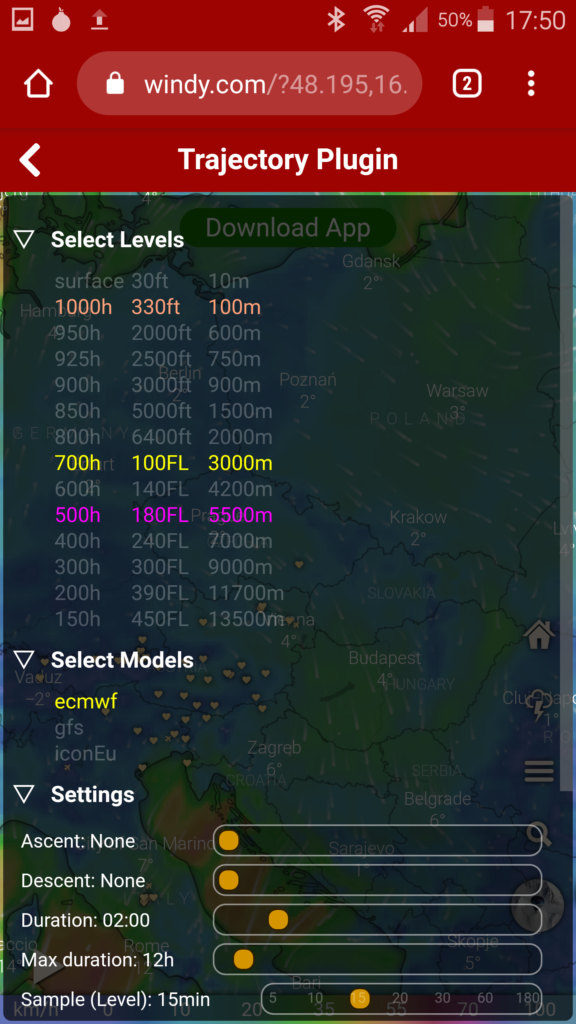
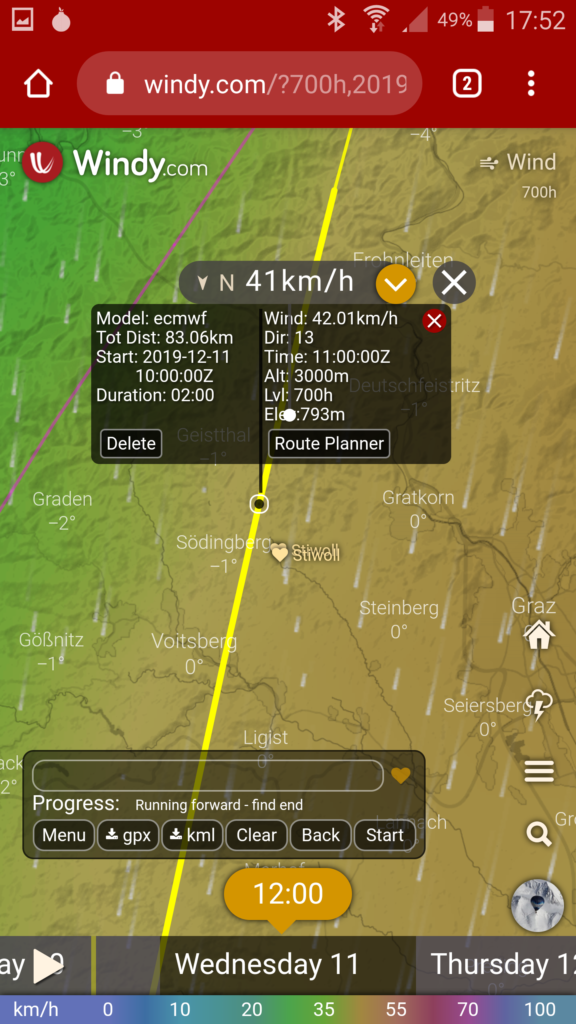
So far I thought the windy trajectory function only works on desktop browsers, and not on mobiles or pads. Well – I stand corrected thanks to a post in the Windy community forum by the prolific Jakub Vrána.
To do so, open https://windy.com/plugins in a browser on your mobile/pad, and choose the trajectory plugin like on the desktop (just ignore the ‘Download App’ button!). Things work mostly like on the desktop – here’s proof from an iPhone using Safari:
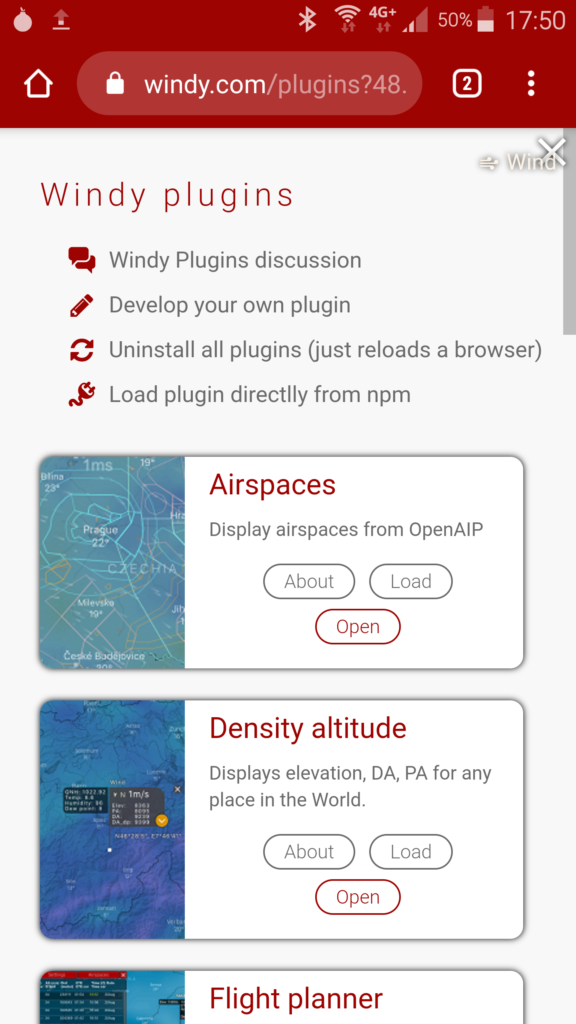
And here Chrome on Android:
However, the Route Planner function currently does not work on mobile. Other than that – almost like on the desktop!